JIRA is largely used (Atlassian suite is adopted by 170k+ customers over 190 countries) and one of the reasons for that is that its platform allows for deploying new add-ons to expand its capabilities. You can find a plethora of plugins in Atlassian Marketplace, but purchasing all plugins you need can quickly add up if you have a large user base. Sometimes all you need is to transform data for reports or metrics, even if that’s done outside of JIRA in an Excel spreadsheet or command-line console. In this article, I cover two ways to extract data from JIRA and transform it while minimizing manual work: Excel Datasources and Python API calls.
Excel Datasources
JIRA allows you to export filter results in CSV. One could generate a CSV from JIRA, copy its data, and then transform the data in Excel to create custom charts or consolidated reports. While that works, if you need to do that multiple times, you’ll be wasting a lot of time with manual work. We can leverage the same CSV feature in combination with Excel import data feature to get the work done faster. The steps are pretty straightforward:
- Create and save a filter in JIRA
- In the filter result page, go to Export >> CSV (Current fields), right-click on it and copy link address
- It should be something like https://yourjira/sr/jira.issueviews:searchrequest-csv-current-fields/19974/SearchRequest-19974.csv where 19974 is the JIRA filter ID
- Open Excel and go to Data >> From Text/CSV
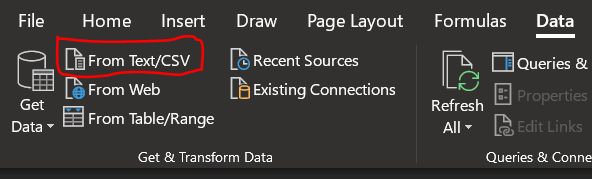
- Paste the JIRA deep-link to export the filter as CSV
- Excel will connect to JIRA and you’ll be asked to select the authentication method if that’s the first time you’re doing it
- Select Basic and type your JIRA credentials. Important: Authentication methods may vary depending on how your JIRA instance is set up and your credentials will not be shared if you send that spreadsheet to other people
- Excel will show you a preview of the retrieved data. You can click on 1) Load to create a new worksheet and load the data, 2) Load To… and customize where to load the data to, or 3) Transform Data to adjust which columns you want to import
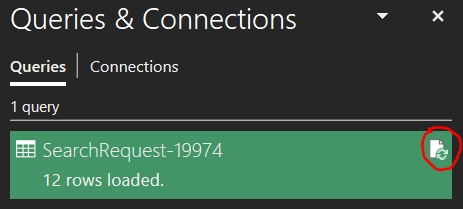
- Once the data is loaded, you can go to Data >> Queries & Connections and click on the refresh icon to reload the query
- Now you can create a separate worksheet and create your custom reports or aggregations based on the raw data imported from JIRA. That’s it. Quick and dirty, right?
Python API calls
If you need to apply more complex logic to your data, an alternative way is to call JIRA APIs utilizing a programming language to parse and transform it. I’m showing a very basic Python example of how to calculate the % of closed Story Points in a filter, but you could apply a similar process using whichever language you prefer for more complex calculations.
Firstly, you need to understand how to authenticate to be able to call JIRA APIs. You can use either OAuth, Basic, or Cookie-based methods. I’m only covering the Basic one in this article, which should be used only for personal scripts. OAuth is the most secure and recommended method but it will require additional configuration in JIRA server to authorize your script to call the APIs. You can read more about the other methods here.
Prep work
- Make sure you have Python 3.5+ installed in your system
- Install jira module with pip install jira
Python Code
See below the Python code. You can also access it from github.
from jira import JIRA
import getpass

# add your JIRA instance URL here
jiraURL = 'https://myjira.com'

# update with JIRA username or replace it with
# username = input('Type your JIRA username')
# to ask for the username in the command line
username = 'myusername'

try:
    password = getpass.getpass(prompt='Type your JIRA password: ')
except Exception as error:
    print('Error when getting password', error)
else:
    jira = JIRA(jiraURL, basic_auth=(username, password))
    try:
        filterId = '27629'
        filterJQL = jira.filter(filterId).jql
    except Exception as error:
        print('JIRA filter ' + filterId + 'is not available or does not exist')
    else:
        issues = jira.search_issues(filterJQL)
        totalPoints = closedPoints = 0

        for i in range(len(issues)):
            fields = issues[i].fields
            points = 0 if fields.customfield_10002 == None else fields.customfield_10002

            totalPoints += points
            closedPoints += 0 if fields.status.name != 'Closed' else points

        percentage = 0 if (totalPoints == 0) else (closedPoints / totalPoints) * 100

        print('Total points: ', totalPoints)
        print('Closed points: ', closedPoints)
        print('Closed %: ', round(percentage, 2))
This code connects to the JIRA instance (line 5) using the username (line 10) and the password read via command line (line 13). It retrieves the JQL string (line 20) for the filter which id is 27629 (line 19). Then it retrieves the list of issues for that filter (line 24), iterates through it (line 27), and calculates the total story points (line 31) and closed story points (line 32) assuming that the Story Points value is saved in the customfield_10002 property (line 29). The custom field for Story Points in your JIRA server may differ but you can easily get its ID doing a JIRA query and looking at the autocomplete results. It will show something like the following:

Finally, you just need to run the python script in a command line (like py.exe .\closedPointsJIRA.py) and type your password when asked. Handy, right?